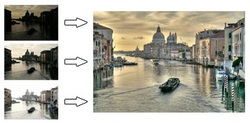
Photomatix Pro Tutorial: The Basics In this tutorial, you will learn how to create a High Dynamic Range (HDR) image using three photographs of the same scene taken under different exposures, and to process it with tone mapping and exposure fusion.
HDR image creation starts with taking photos of a High Dynamic Range scene as detailed in Step 1
Note: Photomatix allows you to process a single image with tone mapping, but this tutorial only covers HDR processing with multiple exposures. Note that a single image is not sufficient to capture the dynamic range of a high contrast scene.
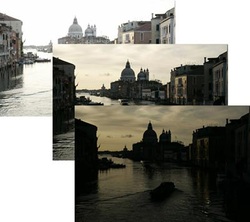
Step 1: Take photos of an HDR sceneTo create the best HDR images, you need to take enough exposures to properly cover the dynamic range of the scene.
If your camera offers Auto-Exposure Bracketing (AEB), select the Continuous Shooting mode, make sure the camera is set to Aperture Priority, and select an exposure increment of +/-2. The camera will automatically vary the shutter speed each time the shutter button is pressed, taking several exposures spaced by two-stop increments.
You may have to change the exposures manually if your camera does not offers AEB, or if it can only take 3 auto-bracketed frames when the dynamic range of the scene requires 5 or more.
Photomatix enables you to align images if the camera moved slightly between frames, but using a tripod is still recommended.
In Step 2, we will load the images into Photomatix.
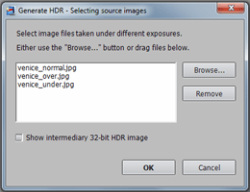
Step 2: Load your bracketed photosThe easiest way to load your bracketed photos is to select the files with Windows Explorer and drag them together Photomatix Pro.
You will then get a dialog asking you what you would like to do with the dragged files. Select Merge for HDR processing and click on OK.
The next dialog lists the files selected. If necessary, you can remove files or select others.
You can also directly access the dialog to select source images by either clicking on the Load Bracketed Photos button on the Workflow Shortcutspanel, or going to the File menu and clicking onLoad Bracketed Photos....
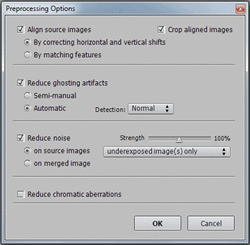
Step 3: Preprocess and merge the photosThe next window lets you specify options for preprocessing and merging the photos.
If your photos were taken hand-held, check the Align source images box and select the By matching features method. The three photos of the Grand Canal were taken using a tripod, but we still check the alignment option to correct for small alignment problems that may happen even with a tripod.
If your scene includes moving objects or people, check the Reduce ghosting artifacts option. Thesemi-manual option is recommended for better results.
If the bracketed photos you loaded are RAW files, check the Reduce noise option with the on source images selected. You may also check this option with jpeg or TIFF files.
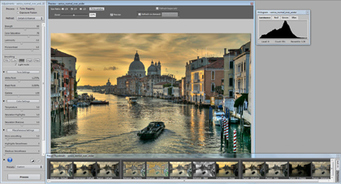
Step 4: Adjust the image to your likingThe Settings window on the left lets you adjust the process, method and settings. There are two processes: Tone Mapping, which is applied to the merged 32-bit HDR image, and Exposure Fusion, which combines the source photos directly.
The Preview window on the right shows a preview of the final tone mapped image. You can adjust the preview size using the radio buttons on top.
It is important to note that the preview is only an approximation -- the final result may slightly differ in the case of the Details Enhancer and Fusion/Adjust methods.
The buttons at the bottom of the Settings window let you undo or redo settings, restore the default settings, and load and save presets.
You can also access presets directly by clicking on the thumbnails of the Preset Thumbnails panel. The "Built-in" presets show by default
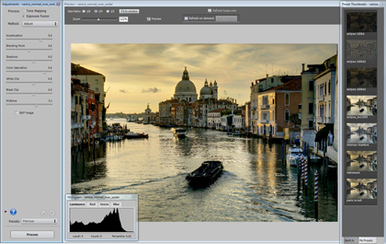
Step 4: Adjust the image (continued)Try different processes and methods with your image.
The Exposure Fusion process tends to produce more natural-looking results and has the advantage of reducing noise.
The Tone Mapping process is the most versatile, offering a large variety of styles, or "looks", depending on the method and settings.
There are two Tone Mapping methods: the Details Enhancer method increases local contrast and details, which makes it possible to process your image in creative ways. The Tone Compressor method produces a more "photographic" look.
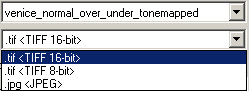
Step 5: Save the image The Preview shows a low resolution representation of the image. To save the image at original resolution, you will have first to process it with the adjustments you selected. To do this, click on the Process button located at bottom of the Settings window.
Once the processing has completed, choose File > Save As.
The processed image is in 16 bits/channel mode. However, you can choose to save it as 8-bit JPEG, if desired. Saving as 16-bit TIFF is recommended for further processing.
- End of tutorial -
Once the processing has completed, choose File > Save As.
The processed image is in 16 bits/channel mode. However, you can choose to save it as 8-bit JPEG, if desired. Saving as 16-bit TIFF is recommended for further processing.
- End of tutorial -
 RSS Feed